To set up Google Ads conversion tracking, create a conversion action in Google Ads under Goals > Conversions, then add two tags in Google Tag Manager: a Conversion Linker tag firing on All Pages, and a Conversion Tracking tag with your Conversion ID and Conversion Label firing on your conversion trigger. The status changes from Unverified to Recording once Google detects the tag, usually within a few hours of it first firing.
By the end of this tutorial, you’ll have Google Ads conversion tracking set up on your website. You’ll see which keywords, ads, and campaigns lead to real leads, sales, or signups, not vanity clicks.
We’ll use Google Tag Manager (GTM) for the whole setup: one conversion action in Google Ads, two tags in GTM, one test, one publish. No code edits on your site.
Why you need conversion tracking for Google Ads
Without conversion tracking, you know someone clicked your ad. That’s it. You don’t know if they bought, signed up, or left after four seconds.
Conversion tracking connects the click to the outcome. It answers the question every marketer eventually gets asked: “We spent $500 on Google Ads last month. What did we actually get?”
It also feeds the Google Ads bidding system. When you put a campaign on a bid strategy like Maximize conversions, you’re telling Google to bid for the clicks most likely to convert. This tag is what reports those conversions back. Without it, Google is bidding blind and you’re paying for clicks and hoping for the best.
Under the hood, the Google Ads tag is a marketing pixel: a small piece of code that watches for a specific action and reports it. If that concept is new, read what a marketing pixel is first, or zoom out with the full guide to how conversion tracking works.
Before you start
You’ll need three things:
- A Google Ads account. Active, with at least one campaign running or about to launch.
- Google Tag Manager installed on your site. If it isn’t yet, follow the GTM installation guide and come back. It takes about 15 minutes.
- A conversion to track. Decide what action counts as a win: a form submission, a purchase, a phone call, a signup.
A tag is a piece of code GTM fires on your site, and a trigger is the rule that decides when it fires. If those terms are fuzzy, skim the Google Tag Manager tutorial before this one. You’ll move faster.
Step 1: Create a conversion action in Google Ads
A conversion action is Google Ads’ name for the specific outcome you want to count. You create it in Google Ads first, because this step generates the two values GTM needs.
Open the Conversions page
Sign in at ads.google.com. In the left menu, click Goals, then Conversions, then Summary.
Goals Conversions SummaryStart a new conversion action
Click + Create conversion action (some accounts still show New conversion action), then select Conversions on a website as the source. Older interfaces label this option Website.
Enter your URL
Enter your website URL and click Scan. Google looks at your site and suggests conversion setups. You can accept a suggestion or, for more control, choose the manual option (Add a conversion action manually). We’ll set it up manually so you see every setting.
Configure the conversion settings
Fill in the settings for your conversion:
- Goal and action optimization (that’s Google’s label for the category picker): choose the category that matches your conversion, like Submit lead form or Purchase.
- Conversion name: something you’ll recognize in reports, like “Contact form lead.”
- Value: assign a dollar value if you know one (average order value, average lead value). Otherwise pick Don’t use a value.
- Count: One or Every. Details in the table below.
Here’s what the count and window settings mean:
| Setting | What it means | Recommended |
|---|---|---|
| Count: One | One conversion per ad click, even if the person converts twice | Use for leads |
| Count: Every | Counts every conversion from one ad click | Use for purchases |
| Click-through window | How long after clicking an ad a conversion can be counted | 30 days (default) |
| View-through window | How long after seeing (not clicking) an ad | 1 day (default) |
Leave the windows at their defaults unless you have a specific reason to change them. Click Save and continue (some accounts still show Create and continue). If Google shows a terms screen, click Agree and finish to complete the action.
Copy your Conversion ID and Conversion Label
On the next screen, choose Use Google Tag Manager as your setup method. Google shows two values:
- Conversion ID: a number like
123456789, shared by every conversion action in your account - Conversion Label: a string of letters and numbers unique to this conversion action
Copy both. They’re the connection between Google Ads and GTM.
a Conversion ID and a Conversion Label on screen. Keep that tab open, or paste both values somewhere safe. You’ll enter them in GTM in the next step.
Step 2: Install the Google Ads tags in GTM
You need two tags in GTM, and this is the part where most tutorials lose you. People set up the Conversion Tracking tag, skip the Conversion Linker, and then wonder why conversions go missing.
Here’s the split:
- The Conversion Linker fires on every page. It catches the click identifier Google attaches to your ad URLs (a parameter called the GCLID) and stores it in a first-party cookie, which is a small file saved by your own domain.
- The Conversion Tracking tag fires only when the conversion happens. It reads that cookie and tells Google Ads which click gets the credit.
Step 2a: Create the Conversion Linker tag
Create a new tag
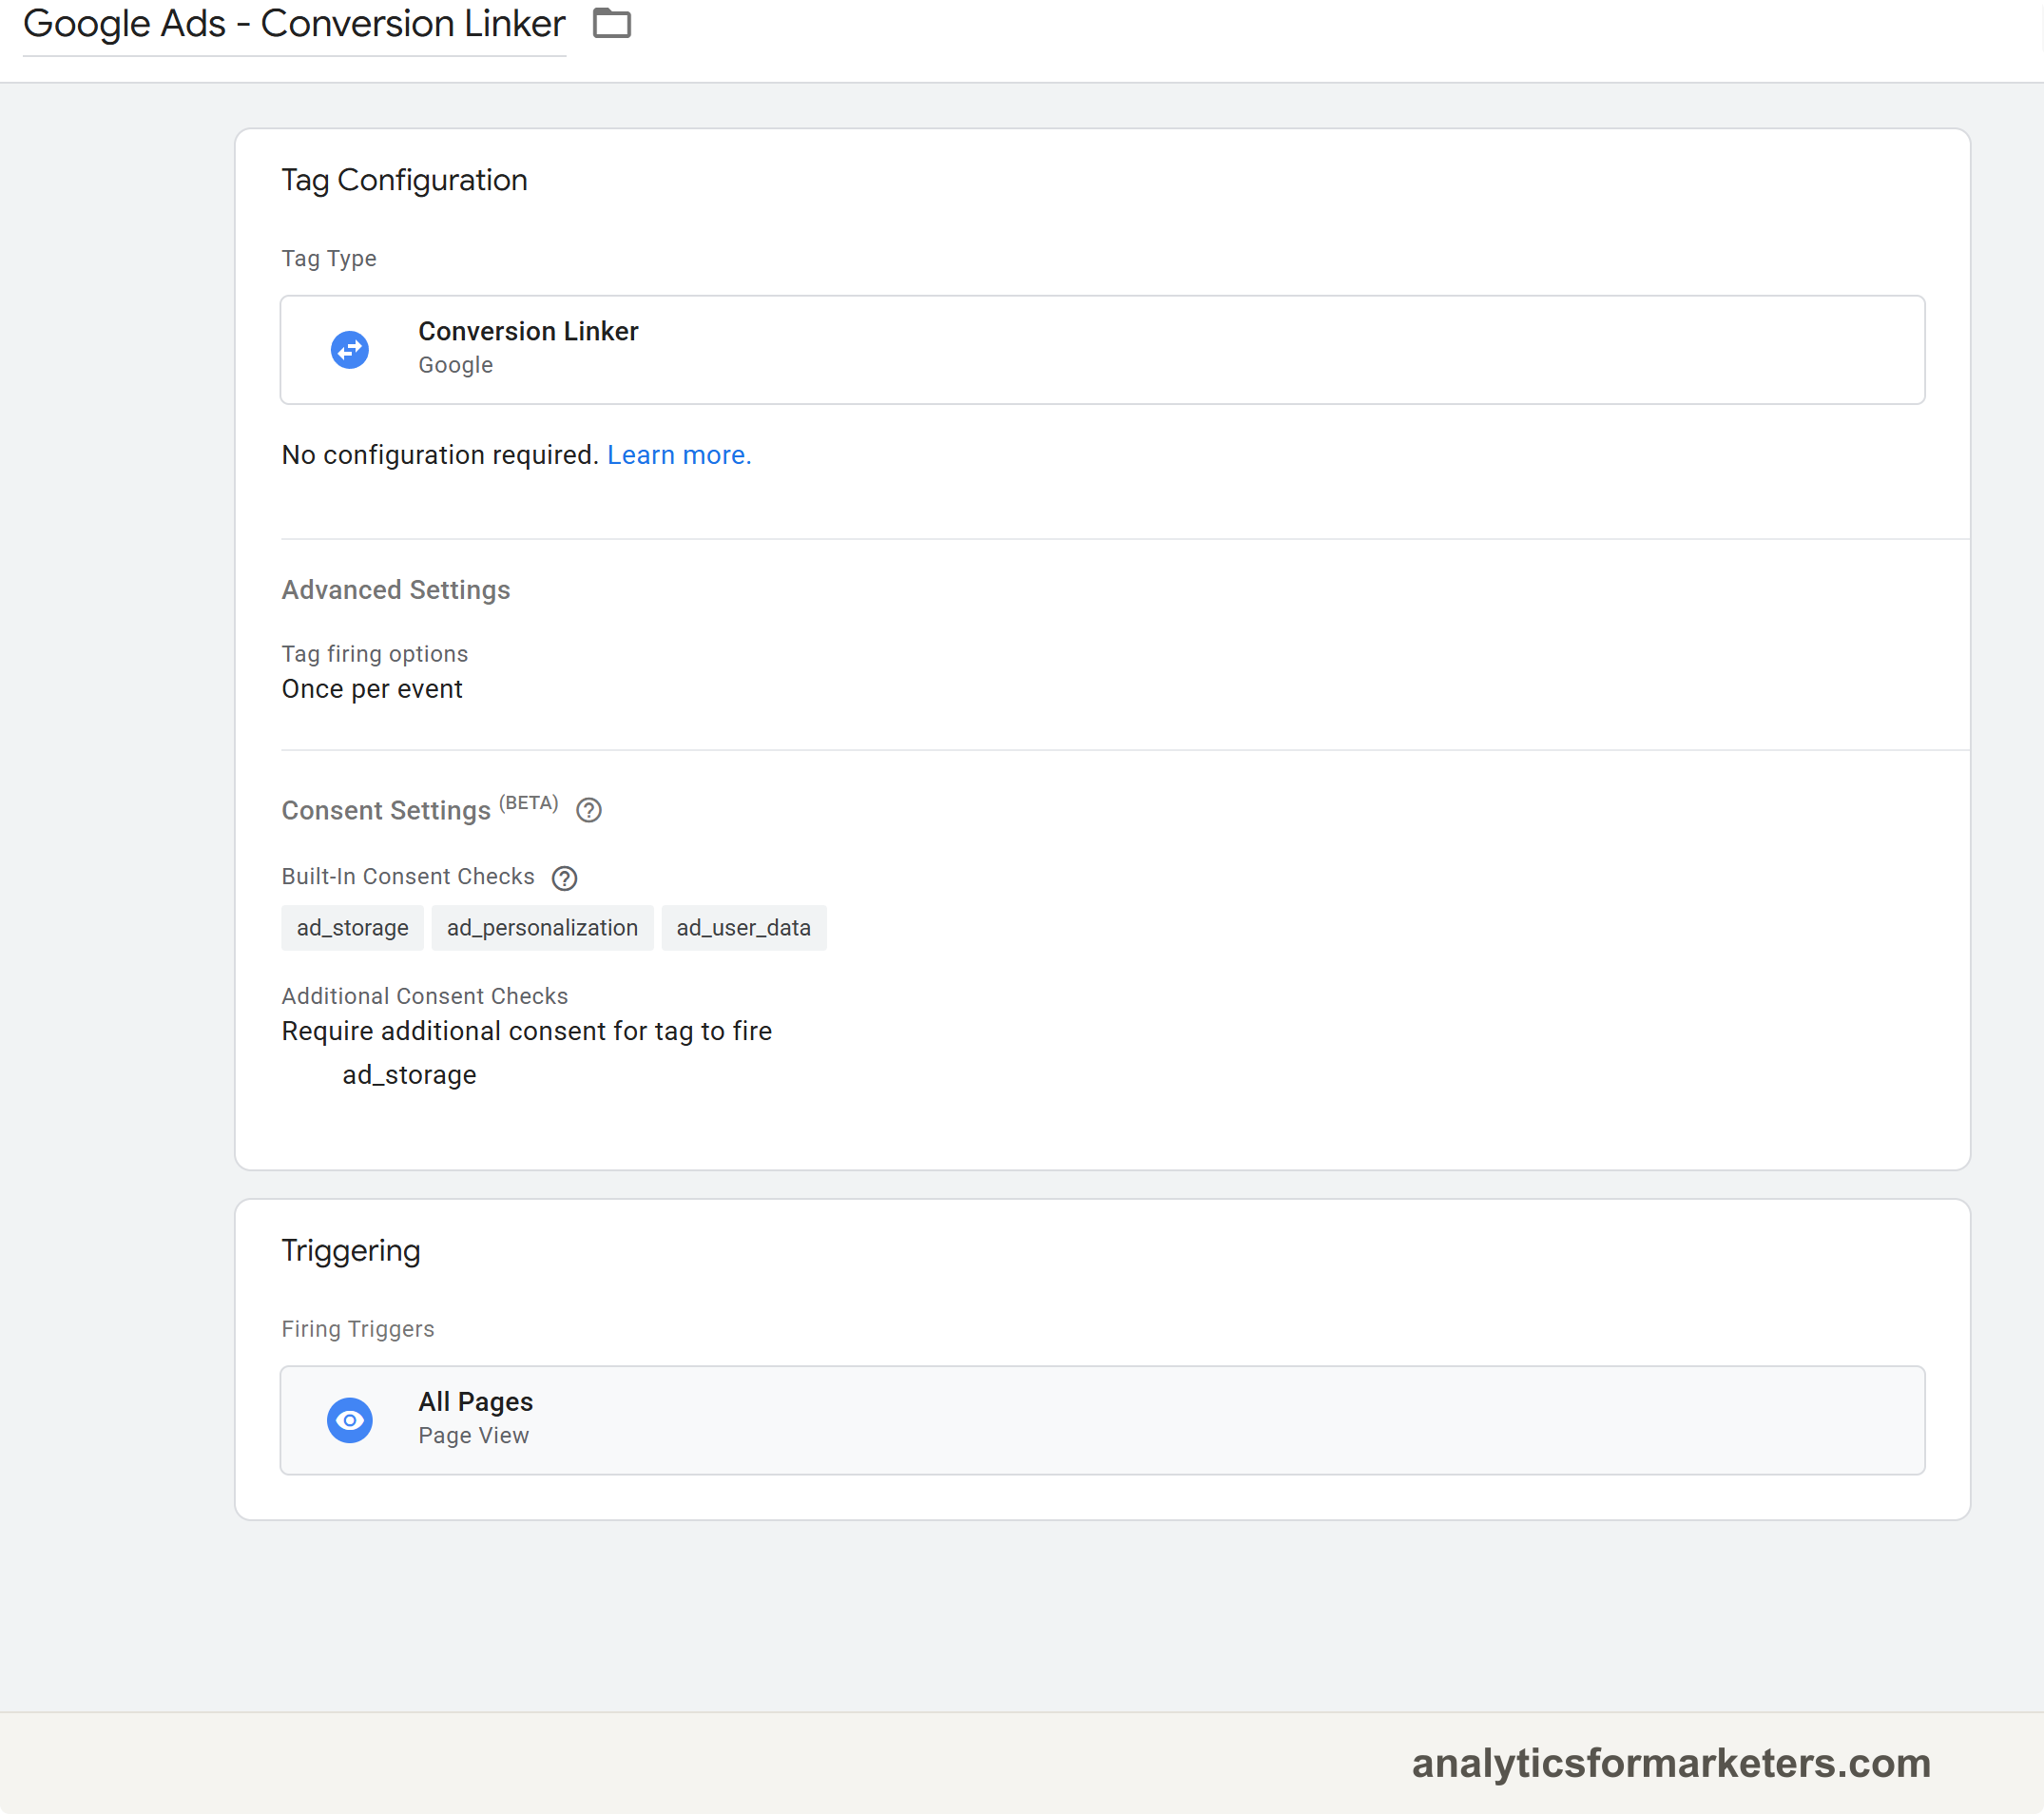
In your GTM workspace, click Tags in the left menu, then New. Name it “Google Ads - Conversion Linker.”
Choose the tag type
Click the Tag Configuration box and select Conversion Linker from the list. There’s nothing to configure inside it. The defaults are what you want.
Set the trigger to All Pages
Click the Triggering box and select All Pages. Click Save.
Step 2b: Create the Conversion Tracking tag
Create another new tag
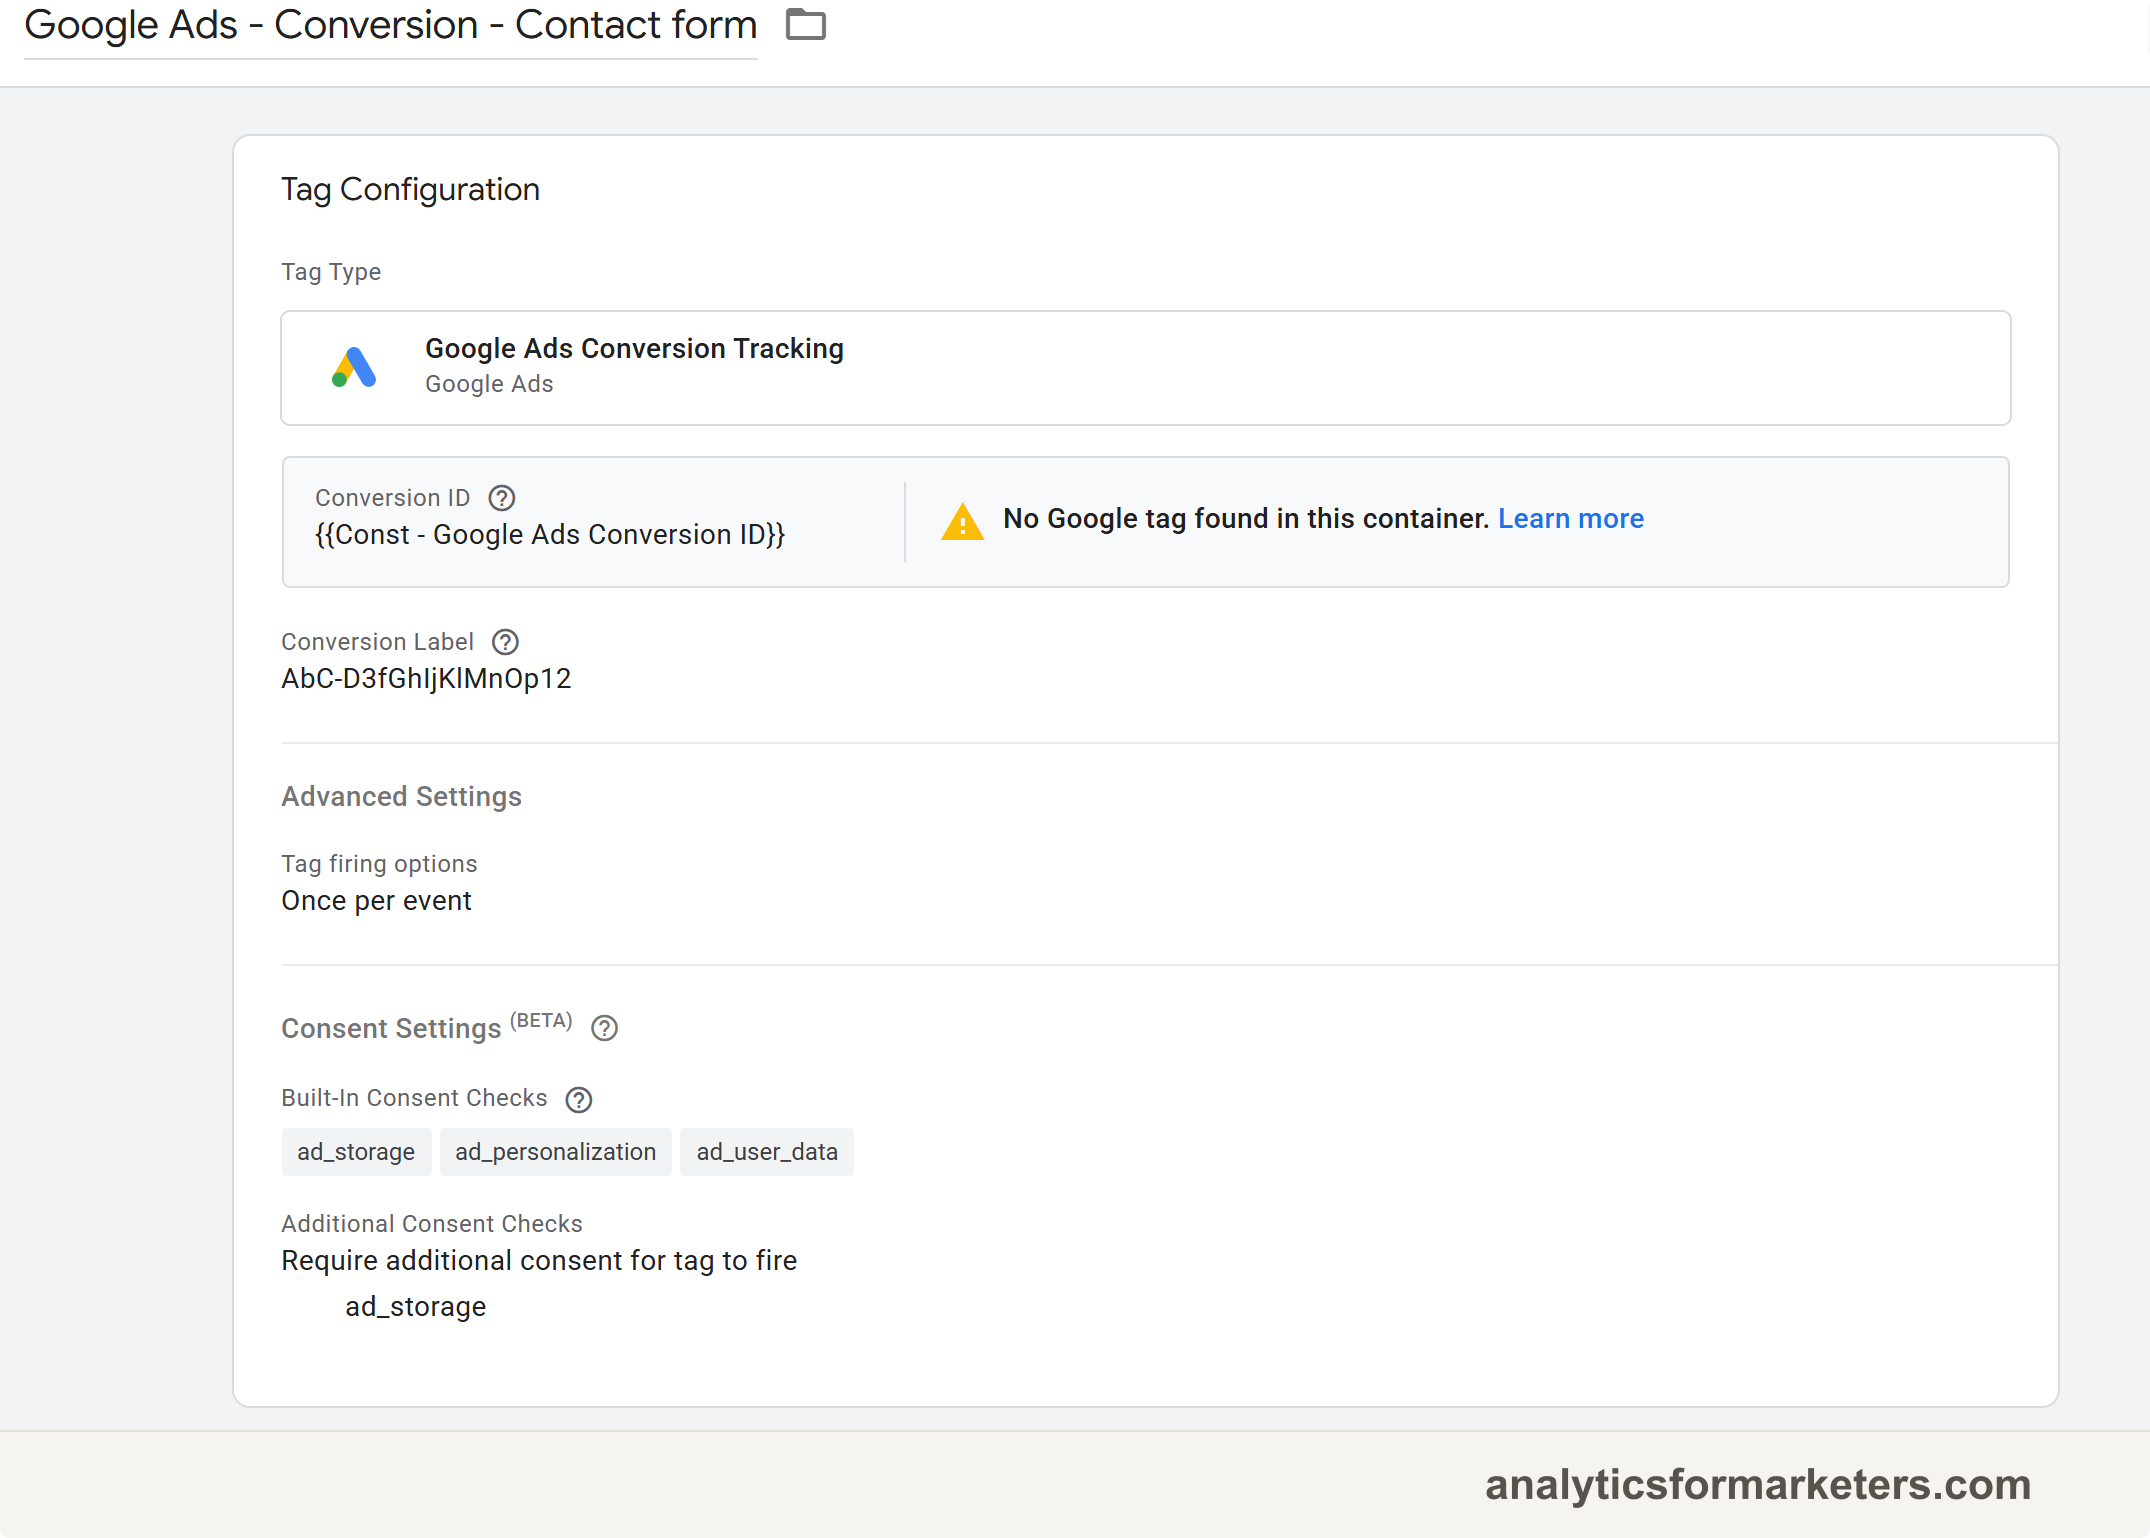
Back in Tags, click New again. Name it after the conversion, like “Google Ads - Conversion - Contact form.”
Choose Google Ads Conversion Tracking
Click Tag Configuration and select Google Ads Conversion Tracking.
Enter your Conversion ID and Label
Paste the Conversion ID and Conversion Label you copied from Google Ads into the matching fields. If your conversion has a value (like a fixed lead value), you can enter it in Conversion Value. Leave the other fields blank for now.
Leave the trigger empty for a moment
This tag should fire only when the conversion happens, and we’ll build that trigger next. Click Save and confirm you want to save without a trigger for now.
two Google Ads tags in your workspace: the Conversion Linker with the All Pages trigger, and the Conversion Tracking tag waiting for its trigger.
Step 3: Set up the conversion trigger
The trigger tells GTM when the conversion happened. The right trigger depends on the conversion type:
| Conversion type | Category in Google Ads | Trigger in GTM | Count setting |
|---|---|---|---|
| Form submission | Lead / Submit lead form | Thank-you page view | One per click |
| Purchase | Purchase | Order confirmation page | Every conversion |
| Phone call from website | Phone call leads | Phone link click | One per click |
| Sign-up | Sign-up | Registration confirmation page | One per click |
The thank-you page method is the most reliable starting point, so let’s walk through that one. It works whenever your form or checkout sends people to a distinct URL after they finish.
Create a new trigger
In GTM, click Triggers in the left menu, then New. Name it “Thank-you page view.”
Configure the page view condition
Click Trigger Configuration and choose Page View. Select Some Page Views, then set the condition:
Page URL contains /thank-youMatch the exact path your site uses. If your confirmation page is /contact/thanks/, use that instead. Click Save.
Attach the trigger to the Conversion Tracking tag
Open your Conversion Tracking tag, click the Triggering box, and select your new “Thank-you page view” trigger. Click Save.
A condition like “contains /thank” will also match /thanks-for-subscribing and /thanksgiving-sale, and every one of those page views becomes a fake conversion. Use the longest URL fragment that’s unique to your confirmation page.
Tracking a form that doesn’t redirect? Use GTM’s built-in Form Submission trigger, or a Custom Event pushed by your form plugin (most major plugins document their event name). For purchases, point the trigger at your order confirmation URL the same way.
Step 4: Test the setup
Never publish a conversion tag without watching it fire first. GTM’s Preview mode shows you exactly what happens.
Start Preview mode
In GTM, click Preview in the top right. Enter your site’s URL and click Connect. Your site opens in a new tab with a “Tag Assistant Connected” badge, and the debug pane opens in the original tab.
Trigger the conversion
In the connected tab, complete the conversion like a visitor would: fill out the form, land on the thank-you page.
Check which tags fired
In the Tag Assistant debug pane, check the Tags Fired section. On every page you visited, the Conversion Linker should appear. On the thank-you page, the Conversion Tracking tag should appear too.
both tags under **Tags
Fired**: the Conversion Linker on every page, and the Conversion Tracking tag on the confirmation page only. If a tag shows under Tags Not Fired, click it to see which trigger condition failed.
Step 5: Publish your GTM changes
Preview mode only affects your own browser. Nothing counts for real visitors until you publish.
Click Submit in the top right of GTM, give the version a descriptive name like “Add Google Ads conversion tracking - contact form,” and click Publish.
You should see the new version listed in your workspace with your name and the date. From this moment, the tags are live for every visitor.
Step 6: Verify conversions are recording
Check back a few hours after publishing to confirm Google Ads is receiving data. Verification usually happens within a few hours of the tag first firing. If your action still says “Unverified” after 24 hours, that’s a sign something is wrong, and the troubleshooting section below is your next stop.
Go to Goals > Conversions > Summary in Google Ads and find your conversion action. The Status column starts as “Unverified,” which means Google hasn’t detected your tag yet. Once it does, the status changes to “Recording conversions.”
Goals Conversions SummaryYou should see the “Recording conversions” status and, as real conversions happen, numbers appearing in the Conversions column of your campaign reports.
A note on self-testing: GTM Preview mode fires tags for real and sends real hits to Google, so even your Preview test can trigger verification. What your test won’t do is show up as a conversion in
reports. You didn’t click an ad, so there’s no GCLID to attribute it to. Publish the container, then confirm the tag fires on your live site. Real conversion numbers only appear once actual ad clicks convert.
What about importing GA4 conversions into Google Ads?
There’s a second way to get conversions into Google Ads: import them from GA4. If you’ve already set up key events in GA4 and linked GA4 to Google Ads, you can go to Goals > Conversions > Summary > Create conversion action > Import > Google Analytics properties > Web and pull those key events in as Google Ads conversions.
The trade-offs:
- Pros: no extra GTM tags, one source of truth for what counts as a conversion.
- Cons: conversions arrive with a processing delay of several hours to a day, and some conversions get lost in translation between GA4’s attribution and Google Ads’ attribution.
Our recommendation: for most marketers, the direct GTM method in this tutorial is more reliable. It reports faster and catches more conversions, which also gives bid strategies better data to work with.
If you set up the GTM tag and import the same conversion from GA4, Google Ads counts each conversion twice, and your cost-per-conversion numbers become fiction. Choose one source per conversion and remove or pause the other.
Troubleshooting common problems
The Conversion Tracking tag fires but conversions never appear. Check the Conversion Linker first. Without it, the click identifier never gets stored, so Google can’t connect the conversion back to the ad. Confirm the Linker exists, fires on All Pages, and was published.
Conversions look inflated. Your trigger is probably too broad. Open GTM Preview, visit a few unrelated pages, and watch whether the Conversion Tracking tag fires where it shouldn’t. Tighten the Page URL condition.
Status stuck on “Unverified” past 24 hours. Re-check the Conversion ID and Conversion Label in your GTM tag against Google Ads. One wrong character sends your conversions to nowhere. Then confirm the container version with your tags was actually published, not left as a draft.
Numbers doubled overnight. You’re likely counting the same conversion from two sources, usually the GTM tag plus a GA4 import. Keep one and remove the other.
What to do next
Your Google Ads conversion tracking is live. From here:
- Watch your campaign reports. Within a week or two you’ll see which keywords and ads drive conversions, not clicks. That’s where budget decisions come from.
- Move to a conversion-based bid strategy like Maximize conversions once you have data flowing, so Google bids toward outcomes instead of traffic.
- Add more conversion actions for other outcomes (phone clicks, signups) by repeating Steps 1 to 3 with a new trigger.
For the bigger picture of pixels, cookies, and attribution across every ad platform, read the full guide to how conversion tracking works.