Install the Google & YouTube app from the Shopify App Store, connect your Google account, and select your GA4 property. The app adds the GA4 tag to every page of your store and sends Shopify's e-commerce events (view_item, add_to_cart, begin_checkout, purchase) to GA4 automatically. The whole setup takes about 10 minutes.
By the end of this tutorial, you’ll have Google Analytics 4 installed on your Shopify store and tracking real e-commerce data: product views, add to carts, checkouts, and purchases. The whole thing takes about 10 minutes.
This is the deep, Shopify-specific version of our general GA4 installation guide. If you’re on WordPress, Squarespace, or a custom site, start there instead.
One thing up front: Shopify removed the old Google Analytics field that used to live under Online Store > Preferences. If a tutorial tells you to paste your Measurement ID there, it’s out of date. The supported path today is the Google & YouTube app, and it’s better anyway. You’ll see why in a minute.
You’ll need two things: a GA4 property with a Measurement ID (the code starting with G-; here’s where to find your Measurement ID if you’re not sure), and admin access to your Shopify store. If you don’t have a GA4 property yet, the GA4 beginner’s guide walks through creating one.
The right way: the Google & YouTube app
The Google & YouTube app is Shopify’s official Google integration, built by Google. It does two things for you:
- It adds the GA4 tag to every page of your store, including checkout pages you can’t edit yourself.
- It sends Shopify’s standard e-commerce events to GA4 automatically. No code, no tag configuration.
That second part is the big win. On most platforms, getting purchase tracking into GA4 means writing data layer code or paying a developer. On Shopify, the app handles it.
Here’s the full setup.
Open Apps and sales channels
In your Shopify admin, click Settings in the bottom-left corner, then click Apps and sales channels.
Settings Apps and sales channelsYou should see: a list of the apps and sales channels already installed on your store.
Install the Google & YouTube app
Click Shopify App Store at the top of the page. In the App Store, search for “Google & YouTube” and open the listing. The developer should be listed as Google.
Click Install. Shopify shows you what the app can access; click Install again to confirm.
You should see: the app open inside your Shopify admin with a prompt to connect your Google account.
Connect your Google account
Click Connect Google account. A Google sign-in window opens.
Sign in with the Google account that has access to your GA4 property. This matters: if your agency or a coworker created the GA4 property under a different account, connecting your personal Gmail here won’t show the right property in the next step.
Google asks for permission to link with Shopify. Review the list and click Continue.
You should see: the app now shows your Google acc
ount email as connected.
Select your GA4 property
In the app, find the Google Analytics section (in the app’s Settings tab on current versions). Click Connect, then pick your GA4 property from the dropdown.
Double-check you’re picking the right one. The property name should match the one in your GA4 account, and if you open it in GA4 its Measurement ID should be the G- code you found earlier.
Click Connect to confirm.
You should see: your GA4 property listed as connected in the Google Analytics section.
Skip the extras (for now)
The app will also offer to connect Google Merchant Center an
d set up product listings for Google Shopping. That’s useful if you plan to advertise on Google, but it’s not required for analytics.
You can skip those prompts. Your GA4 connection is live either way.
You should see: the app’s overview page, with Google Analytics showing as connected. Tracking starts within a few minutes.
What you get automatically
Once connected, the app sends Shopify’s standard e-commerce events to GA4. Here’s what each one means:
| Event | When it fires |
|---|---|
page_view | Someone views any page of your store |
search | Someone uses your store’s search bar |
view_item | Someone views a product page |
add_to_cart | Someone adds a product to their cart |
begin_checkout | Someone starts the checkout process |
add_payment_info | Someone enters payment details during checkout |
purchase | Someone completes an order, with revenue, items, and order ID attached |
In plain English: GA4 can now show you the whole funnel. How many people viewed a product, how many added it to their cart, how many started checkout, and how many bought. That funnel is where most of the useful e-commerce insights live, and you got it without touching a line of code.
The alternative: manual gtag.js install
You can install GA4 on Shopify manually, either by adding a custom pixel (a snippet of tracking code managed under Settings > Customer events) or by pasting the gtag.js code into your theme’s theme.liquid file before the closing </head> tag.
Here’s the honest assessment: don’t, unless you have a specific reason.
A manual gtag.js install tracks pageviews fine. But it can’t reliably track checkout or purchases, because standard Shopify plans don’t let you edit checkout pages. Your tracking code never loads there, so your funnel data stops at the cart. A custom pixel can be built out to cover e-commerce events, but writing one correctly is developer work with real room for error.
The app gives you everything the manual route gives you, plus the checkout and purchase events the manual route can’t reach. If you’re reading an install guide, the app is your path.
Verify it’s working
This is the part people skip. Don’t skip it.
- Open your store in a new browser tab (use incognito with ad blockers off, so nothing interferes).
- View a product, then add it to your cart.
- In GA4, go to Reports > Realtime.
- Find the Event count by Event name card.
You should see: view_item and add_to_cart in the event list within a few seconds, alongside page_view.
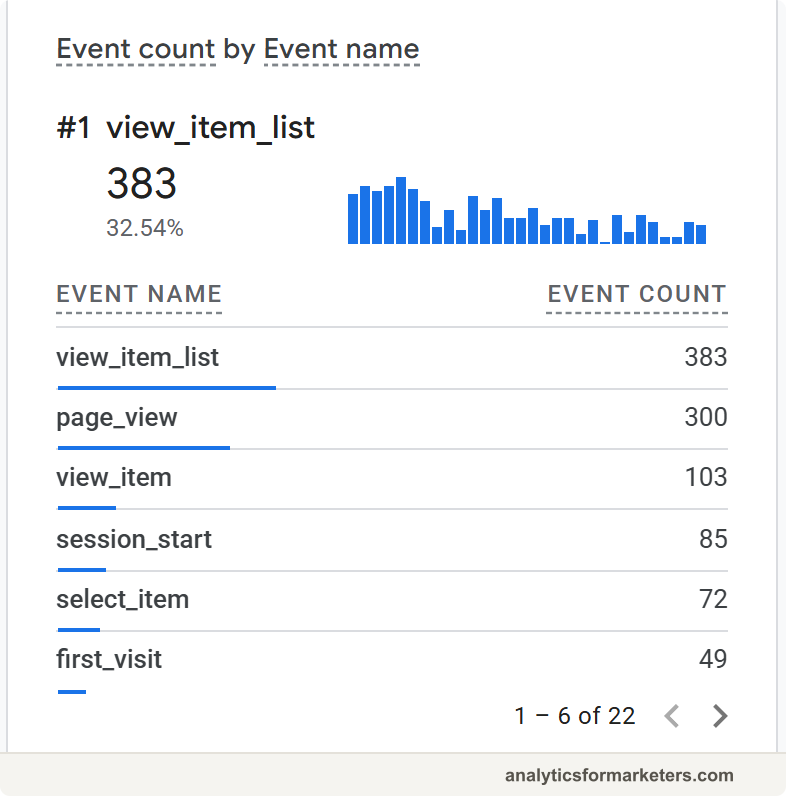
To confirm purchase tracking, place a test order. Go to Settings > Payments: if you use Shopify Payments, it has its own test mode you can switch on; otherwise, temporarily switch to the third-party provider (for testing) Bogus Gateway. Real payments are disabled while you’re testing, so run a fake transaction, watch for the purchase event in Realtime, then switch your real provider back on. If a real order comes in soon anyway, that works too.
Full reports take longer. E-commerce revenue and the standard reports populate within 24 to 48 hours, so don’t worry if Reports > Monetization looks empty on day one. Realtime is your proof that everything works.
Troubleshooting
You connected the wrong GA4 property
Symptom: Realtime shows nothing, but the app says everything is connected. You’re probably sending data to a property you’re not looking at, often an old or duplicate one.
Open the Google & YouTube app, go to the Google Analytics section, and check which property is connected. Compare its Measurement ID against the property you have open in GA4. If they don’t match, disconnect and reconnect to the right one.
If you (or a previous developer) ever pasted gtag.js code into theme.liquid, remove it before or right after connecting the app. Otherwise every pageview gets counted twice, which doubles your traffic numbers and wrecks your reports. Check theme.liquid for any script mentioning googletagmanager.com/gtag and check Settings > Customer events for old custom pixels doing the same job.
Your store is still password-protected
Symptom: the app is connected, but Realtime shows nothing no matter what you do. If your store still has its storefront password on (common before launch), the integration can’t track events. Visitors, including you, hit the password page instead of your real store.
Remove the password under Online Store > Preferences, or wait and run your test after launch. Once the storefront is public, events start flowing.
Events missing for some visitors
Shopify has built-in privacy controls under Settings > Customer privacy. In regions with consent laws (the EU, UK, and some US states), these settings can hold back tracking until a visitor accepts cookies.
That’s working as intended, not broken. But it does mean GA4 will never see 100 percent of your visitors in those regions. If your store sells mostly into the EU, expect a bigger gap between Shopify’s numbers and GA4’s.
GA4 purchases don’t match Shopify orders
Your GA4 purchase count will almost never match your Shopify order count exactly, and that’s normal. Three reasons:
- Ad blockers. Some buyers block the GA4 tag entirely, so their purchase is never reported to GA4. Shopify still records the order because it happens on the server.
- Attribution and counting differences. GA4 and Shopify use different rules for crediting and timing transactions, so orders can land in different buckets or days.
- Timezones. If your GA4 property and Shopify store are set to different timezones, daily totals shift at the boundaries.
The gap is typically 5 to 15 percent, sometimes more. Use Shopify for your true revenue number and GA4 for the story behind it: which channels, campaigns, and products drove those sales.
What to do next
GA4 is installed and your store’s e-commerce events are flowing. Here’s where to go from here:
- Mark purchase as a key event. A key event (what GA4 used to call a conversion) is an event you flag as important so GA4 features it in reports and can share it with Google Ads. Our guide to setting up conversions and key events in GA4 walks through it.
- Set up the Facebook Pixel if you run Meta ads. GA4 doesn’t replace it; follow the Facebook Pixel setup guide to run both side by side.
- Add Google Tag Manager for storefront extras like scroll and click tracking, once the basics are flowing. The GTM on Shopify guide covers the install and the checkout limitation honestly.
- Give it a week, then build a simple dashboard around your funnel: sessions, view_item, add_to_cart, begin_checkout, purchase. Watching where people drop off tells you what to fix first.
And if GA4 itself still feels unfamiliar, the GA4 beginner’s guide covers the reports and concepts you’ll use every week.